In the fast-paced world of web development, having an HTML cheat sheet at your fingertips can save time and make coding more efficient. Whether you’re a beginner taking your first steps in building web pages or a student enrolled in a web development full course, an HTML cheat sheet serves as a quick and reliable reference for essential tags, attributes, and elements.
HTML (HyperText Markup Language) is the backbone of the web, providing the structural foundation for every website you visit.
It’s the framework for all content, design, and functionality. While HTML is easy to learn, it has many components that can be hard to remember, especially when juggling multiple tasks.
This cheat sheet is designed to benefit anyone involved in web development or who wants to start with software engineering basics. A clear and comprehensive resource can make all the difference in mastering HTML and creating outstanding web experiences.
Basic HTML Structure
Every HTML document follows a standard structure that ensures browsers can correctly interpret and display your content. This structure acts as the foundation for building any webpage. Below is an explanation of the key components of an HTML document and how they fit together.
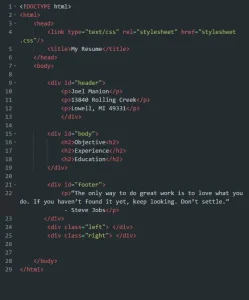
<!DOCTYPE html>

<html>

  <head>

    <title>Title of the Document</title>

  </head>

  <body>

    <!-- Content goes here -->

  </body>

</html>
Key Elements in the HTML Document Structure
- <!DOCTYPE html>
- Declares the document type and version of HTML being used (HTML5 in this case).
- It ensures that the browser renders the page correctly.
- <html> Element
- The root element that encapsulates all the content of the document.
- Represents the beginning and end of the HTML document.
- <head> Element
- Contains metadata about the document, such as its title, character set, linked stylesheets, and scripts.
Information within this section is not displayed on the webpage but is critical for functionality.
Example:
<head>

  <meta charset="UTF-8">

  <title>My Webpage</title>

  <link rel="stylesheet" href="styles.css">

</head>- <title> Element
- Specifies the title of the document, which appears in the browser’s title bar or tab.
- <body> Element
- Contains all the visible content displayed on the webpage, such as text, images, videos, and forms.
- This is where the main elements of your webpage are structured.
Example in Action
When the above code is loaded into a browser, the visible portion (from the <body> section) will be rendered, while the metadata in the <head> ensures proper functionality and styling.
This foundational structure is the first step in creating any HTML document, making it crucial to understand for web development at any level.
Essential HTML Elements
HTML provides a variety of elements to structure and format content on a webpage. Here are some of the most commonly used elements that form the foundation of any HTML document.
1. Headings: <h1> to <h6>
Headings define the titles and subtitles in your content. They range from <h1> (the largest and most important) to <h6> (the smallest).
Example:
<h1>Main Heading (Largest)</h1>

<h2>Subheading</h2>

<h3>Section Title</h3>

<h4>Smaller Section</h4>

<h5>Subsection Title</h5>

<h6>Smallest Heading</h6>- Best Practices:
- Use headings in a hierarchical order.
- Limit the use of <h1> to one per page for better SEO.
2. Paragraphs: <p>
The <p> element defines a block of text or a paragraph.
Example:
<p>This is a paragraph of text. It is used to display blocks of information on a webpage.</p>Best Practices:
- Use separate <p> tags for distinct ideas or blocks of content.
- Avoid nesting other block elements inside a <p> tag.
3. Line Breaks: <br>
The <br> element inserts a single line break in the content. It does not create a new block but simply breaks the line.
Example:
<p>This is the first line.<br>This is the second line after a line break.</p>Note: Use <br> sparingly. For larger breaks between content, consider using CSS for spacing.
4. Horizontal Rules: <hr>
The <hr> element creates a horizontal line, often used to separate content sections visually.
Example:
<p>Section 1 Content</p>

<hr>

<p>Section 2 Content</p>- Styling Tip: The <hr> element can be styled using CSS to customize its color, thickness, or style.
5. Comments: <!– Comment here –>
Comments are not displayed in the browser but help add notes or explanations within your HTML code.
Example:
<!-- This is a comment. It is ignored by the browser. -->

<p>This text will appear on the webpage.</p>
Best Practices:
- Use comments to explain complex code or temporarily disable sections of code during debugging.
- Avoid leaving unnecessary or outdated comments in production code.
These essential elements form the backbone of webpage structure and provide clarity and organization for both developers and users. Mastering their use will set a strong foundation for your HTML skills.
Text Formatting Tags
HTML offers several tags for text formatting, allowing you to emphasize or style specific parts of your content. Below are some commonly used text formatting tags, with examples to illustrate their functionality.
Bold: <b> or <strong>
- <b>: Makes text bold for visual emphasis.
- <strong>: Similar to <b> but with semantic importance, indicating that the text is significant.
Example:
<p>This is <b>bold text</b>.</p>

<p>This is <strong>important bold text</strong>.</p>
Italic: <i> or <em>
- <i>: Makes text italic for stylistic emphasis.
- <em>: Similar to <i> but conveys emphasis with semantic meaning.
Example:
<p>This is <i>italicized text</i>.</p>

<p>This is <em>emphasized italic text</em>.</p>
Underline: <u>
- The <u> tag is used to underline text.
- In modern HTML, it’s often used to represent text with non-textual annotations (e.g., misspelled words).
Example:
<p>This is <u>underlined text</u>.</p>Strikethrough: <s>
- The <s> tag strikes through the text, indicating something is no longer valid (e.g., outdated or incorrect text).
Example:
<p>This is <s>strikethrough text</s>.</p>Superscript and Subscript: <sup> and <sub>
- <sup>: Displays text as superscript, commonly used for exponents or footnotes.
- <sub>: Displays text as subscript, often used for chemical formulas or mathematical notations.
Example:
<p>Superscript: 10<sup>2</sup> = 100</p>

<p>Subscript: H<sub>2</sub>O</p>
Summary Table
| TAG | Purpose | Example |
| <b> | Bold text | This is
. |
| <strong> | Important bold text | This is
. |
| <i> | Italic text | This is
. |
| <em> | Emphasized italic text | This is
. |
| <u> | Underlined text | This is
. |
| <s> | Strikethrough text | This is
. |
| <sup> | Superscript text |
. |
| <sub> | Subscript text |
. |
Lists in HTML
HTML provides two primary types of lists for organizing content: ordered lists and unordered lists. Both types use <li> (list item) tags to define individual items within the list.
1. Ordered List: <ol>
An ordered list is used when the order or sequence of items is important. It automatically numbers the list items.
Example:
<ol>

  <li>First item</li>

  <li>Second item</li>

  <li>Third item</li>

</ol>
Output:
- First item
- Second item
- Third item
- Attributes for <ol>:
type: Specifies the numbering style (1, A, a, I, i).
Example:
<ol type="A">

  <li>Option A</li>

  <li>Option B</li>

</ol>start: Specifies the starting value of the list.
Example:
<ol start="5">

  <li>Fifth item</li>

  <li>Sixth item</li>

</ol>
2. Unordered List: <ul>
An unordered list is used when the order of items doesn’t matter. It displays bullet points for each item.
Example:
<ul>

  <li>First item</li>

  <li>Second item</li>

  <li>Third item</li>

</ul>
Output:
- First item
- Second item
- Third item
- Styling the bullets:
You can use CSS to customize the bullet style using the list-style-type property.
Example
<ul style="list-style-type: square;">

  <li>Square bullet</li>

  <li>Another item</li>

</ul>
3. List Items: <li>
The <li> tag is used to define each item in a list, whether it’s an ordered or unordered list.
Example:
<ul>

  <li>Item 1</li>

  <li>Item 2</li>

</ul>
4. Nesting Lists:
Lists can be nested to create sub-lists.
Example:
<ul>

  <li>Main item 1</li>

  <li>Main item 2

    <ul>

      <li>Sub-item 1</li>

      <li>Sub-item 2</li>

    </ul>

  </li>

  <li>Main item 3</li>

</ul>
Output:
- Main item 1
- Main item 2
- Sub-item 1
- Sub-item 2
- Main item 3
Summary Table
| List Type | Tag | Purpose | Example |
| Ordered List | <ol> | Numbered or sequential lists |
|
| Unordered List | <ul> | Lists with bullet points |
|
| List Item | <li> | Individual item in a list |
|
| Nested List | <ul> or <ol> within a list | Sub-lists for hierarchical data |
|
Lists are essential for organizing content into structured, easy-to-read formats. They enhance clarity, making information more accessible and visually appealing.
| List Type | Tag | Purpose | Example |
| Ordered List | <ol> | Numbered or sequential lists |
|
| Unordered List | <ul> | Lists with bullet points |
|
| List Item | <li> | Individual items in a list |
|
| Nested List | <ul> or <ol> within a list | Sub-lists for hierarchical data |
|
Links and Anchor Tags
Links and anchor tags in HTML allow navigation between web pages, sections within a page, or external websites. They are an integral part of building interactive and connected web content.
Hyperlinks:
<a href="URL">Link Text</a>The <a> tag (anchor tag) creates hyperlinks. The href attribute specifies the page URL or resource to which to link.
Example:
<a href="https://example.com">Visit Example</a>Output:
Visit Example
Target Attribute for Opening in a New Tab: target=”_blank”
To open a link in a new tab or window, use the target=”_blank” attribute.
Example:
<a href="https://example.com" target="_blank">Open in New Tab</a>Note: Adding rel=”noopener noreferrer” is recommended for security when using target=”_blank”.
Example:
<a href="https://example.com" target="_blank" rel="noopener noreferrer">Secure Link</a>Explanation of rel=”noopener noreferrer” in Simple Terms
When you use target=”_blank” to open a link in a new tab, the new tab can still access and control certain parts of your original page.
This can be a security risk, especially if you’re linking to an untrusted website.
By adding rel=”noopener noreferrer”, you block the new tab from accessing your page.
Here’s what it does:
- noopener:
Prevents the new tab (the website you’re linking to) from accessing or controlling your original page via JavaScript.- This protects your website from being tampered with, like replacing your content or stealing sensitive information.
- Noreferrer
Stops your website from passing referrer information (your page’s URL) to the new tab. This prevents the website you’re linking to from knowing where the user came from.
LInking Within the Same Page
Anchor tags can link to specific sections of a page using id attributes and #.
Example:
<a href="#section1">Go to Section 1</a>

<h2 id="section1">Section 1</h2>

<p>This is Section 1.</p>
Clicking “Go to Section 1” scrolls to the specified section.
Images in HTML
Images are added using the <img> tag, which does not have a closing tag. The src (source) and alt (alternative text) attributes are required.
Adding Images with <img>
The src attribute specifies the image’s URL, and the alt attribute provides descriptive text for accessibility when the image fails to load.
Example:
<img src="image.jpg" alt="A beautiful sunset" width="500" height="300">- Attributes:
- src: Path to the image (relative or absolute URL).
- alt: Descriptive text for screen readers or when the image is unavailable.
- width and height: Define the image’s dimensions (in pixels).
Responsive Images
Use the max-width property in CSS or the width attribute with percentage values for responsive images.
Example:
<img src="image.jpg" alt="A responsive image" style="max-width: 100%; height: auto;">Linking Images
You can wrap an image inside an anchor tag to make it clickable.
Example:
<a href="https://example.com">

  <img src="image.jpg" alt="Clickable Image" width="300">

</a>| Tag/Attribute | Purpose | Example |
| <a href=”URL”> | Creates a hyperlink |
|
| target=”_blank” | Opens link in a new tab |
|
| rel=”noopener noreferrer” | Adds security for external links |
|
| <img src=”URL”> | Adds an image |
|
| alt | Describes the image for accessibility |
|
| width and height | Sets image dimensions |
|
Tables in HTML
HTML tables display data in rows and columns, making information easy to organize and read.
Basic Table Structure
The basic structure of an HTML table includes:
- <table>: Defines the table.
- <tr>: Represents a table row.
- <th>: Table header (bold and centered by default).
- <td>: Table data (content within rows).
Example:
<table>

  <tr>

    <th>Header 1</th>

    <th>Header 2</th>

  </tr>

  <tr>

    <td>Data 1</td>

    <td>Data 2</td>

  </tr>

</table>
Output:
| Header 1 | Header 2 |
| Data 1 | Data 2 |
Adding Captions
You can use the <caption> tag to give your table a title. This helps explain the purpose of the table.
Example with Caption:
<table>

  <caption>Sample Table</caption>

  <tr>

    <th>Header 1</th>

    <th>Header 2</th>

  </tr>

  <tr>

    <td>Data 1</td>

    <td>Data 2</td>

  </tr>

</table>
Output:
Sample Table
| Header 1 | Header 2 |
| Data 1 | Data 2 |
Adding Basic Styling
HTML tables can be styled using inline styles or CSS for better appearance.
Example with Styling:
<table style="border-collapse: collapse; width: 100%; border: 1px solid black;">

  <caption style="font-weight: bold; text-align: left;">Styled Table</caption>

  <tr>

    <th style="border: 1px solid black; padding: 8px; background-color: #f2f2f2;">Header 1</th>

    <th style="border: 1px solid black; padding: 8px; background-color: #f2f2f2;">Header 2</th>

  </tr>

  <tr>

    <td style="border: 1px solid black; padding: 8px;">Data 1</td>

    <td style="border: 1px solid black; padding: 8px;">Data 2</td>

  </tr>

</table>
Output:
Styled Table
| Header 1 | Header 2 |
| Data 1 | Data 2 |
Explanation of Styling Properties
- border-collapse: collapse;: Merges borders into a single line to look cleaner.
- border: 1px solid black;: Adds a black border to cells.
- padding: 8px;: Adds spacing inside cells for better readability.
- background-color: #f2f2f2;: Adds a light gray background for header cells.
Tables can be simple or styled for better design. Adding captions helps explain the data, and CSS styling makes your table more attractive and readable.
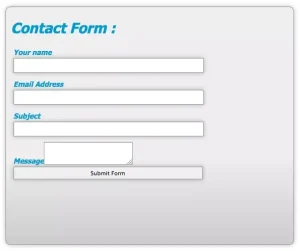
Forms and Input Fields in HTML
Forms allow users to submit data to a server. They’re widely used for collecting user input like names, emails, passwords, etc.
Basic Form Structure
The basic structure of a form includes the <form> element and input fields:
- <form>: Defines the form and its action (where the data is sent).
- <label>: Adds a text label for input fields to improve accessibility.
- <input>: Represents various input types like text, radio, etc.
- <input type=”submit”>: Adds a submit button to send the form data.
Example of a Basic Form:
<form action="submit.php" method="post">

  <label for="name">Name:</label>

  <input type="text" id="name" name="name">

  <input type="submit" value="Submit">

</form>
Explanation:
- action=”submit.php”: The file where form data will be sent for processing.
- method=”post”: Specifies the HTTP method for sending data (post is more secure than get).
- <label for=”name”>: Links the label to the input field with id=”name”.
Common Input Types
HTML provides various types of <input> elements for different types of data:
Text Input:
<input type="text" name="username">- For entering plain text.
Password
<input type="password" name="password">- Masks the input to keep it secure.
Radio Buttons
<input type="radio" name="gender" value="male">Male
<input type="radio" name="gender" value="female">Female
- For selecting one option from multiple choices.
Checkboxes
<input type="checkbox" name="subscribe" value="yes"> Subscribe to Newsletter- For toggling multiple options on/off.
Date Picker:
html
<input type=”date” name=”dob”>
- Lets users pick a date using a calendar interface.
Email Input
<input type="email" name="email">- Validates email addresses automatically.
Number Input
<input type="number" name="age" min="1" max="100">- Restricts input to numbers within a defined range.
Submit Button
<input type="submit" value="Submit Form">- Sends the form data to the server.
Complete Example with Multiple Input Types
<form action="submit.php" method="post">

  <label for="name">Name:</label>

  <input type="text" id="name" name="name">

  <label for="email">Email:</label>

  <input type="email" id="email" name="email">

  <label for="password">Password:</label>

  <input type="password" id="password" name="password">

  <label for="gender">Gender:</label>

  <input type="radio" id="male" name="gender" value="male">

  <label for="male">Male</label>

  <input type="radio" id="female" name="gender" value="female">

  <label for="female">Female</label>

  <label for="subscribe">Subscribe:</label>

  <input type="checkbox" id="subscribe" name="subscribe" value="yes">

  <label for="dob">Date of Birth:</label>

  <input type="date" id="dob" name="dob">

  <input type="submit" value="Register">

</form>
Summary
Forms are essential for gathering user information and submitting it to a server. You can create interactive forms tailored to your needs by combining different input types. Labels improve user accessibility, and attributes like type, id, and name define input fields’ behavior.
HTML Attributes
HTML attributes provide additional information about HTML elements. They are usually written in name-value pairs within the opening tag.
Common Global Attributes
id:
Unique identifier for an element. Useful for targeting the element in CSS or JavaScript.
Example
<div id="header">Content</div>- class:
Used to assign a group of elements to the same style or function.
Example
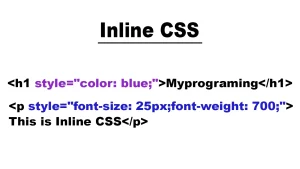
<p class="highlight">This is highlighted text.</p> - style:
Inline CSS styling. While not recommended for large-scale projects, it’s useful for quick, small styles.
Example:
<h1 style="color: blue; text-align: center;">Welcome!</h1>- title:
Provides additional information about an element, typically shown as a tooltip when the mouse hovers over the element.
Example:
<img src="image.jpg" alt="An image" title="This is an image">Inline Styles vs. External CSS
Inline Styles:
Defined within the HTML tag using the style attribute. Good for quick styling but less efficient for larger projects.
Example:
<p style="color: red;">This is inline styling.</p>External CSS:
Defined in a separate CSS file linked to the HTML document using the <link> tag. This is the preferred method for organizing and maintaining styles across multiple pages.
Example:
<link rel="stylesheet" href="styles.css">HTML5 Semantic Elements
Semantic elements give meaning to the content, helping search engines and developers understand the page’s structure better. They make HTML documents more readable and accessible.
<header>:
Represents introductory content, often containing the navigation bar or logo.
Example 1:
<header>

  <h1>Welcome to My Website</h1>

  <nav>Navigation</nav>

</header><footer>:
Represents the footer section of a webpage, often containing copyright or contact information.
Example:
<footer>
<p>© 2025 My Website</p>
</footer><article>:
Represents a self-contained piece of content that can be distributed or reused (e.g., blog posts).
Example:
<article>

  <h2>My First Blog Post</h2>

  <p>This is a post about web development.</p>

</article><section>:
Represents a section of content, often with a heading. Sections group related content together.
Example:
<section>

  <h2>About Us</h2>

  <p>Information about the company.</p>

</section<nav>:
Represents a section of navigation links.
Example:
<nav>

  <ul>

    <li><a href="#home">Home</a></li>

    <li><a href="#about">About</a></li>

  </ul>

</nav><aside>:
Represents content that is tangentially related to the content around it (e.g., sidebars, quotes, or ads).
Example:
<aside>

  <p>Sponsored Ad</p>

</aside>
Media Elements
HTML5 introduced new elements for embedding media content directly in the browser.
Adding Videos:
Use the <video> tag to embed a video. You can include multiple <source> elements for different video formats (e.g., MP4, WebM).
Example:
<video controls>

  <source src="video.mp4" type="video/mp4">

  <source src="video.webm" type="video/webm">

  Your browser does not support the video tag.

</video>controls: Adds video controls like play, pause, volume, etc.
<source>: Specifies the video file and format.
The text inside the <video> tag will be shown if the browser doesn’t support the video.
Adding Audio:
Use the <audio> tag to embed audio files. Similar to the video tag, you can provide multiple file formats.
Example:
<audio controls>

  <source src="audio.mp3" type="audio/mp3">

  <source src="audio.ogg" type="audio/ogg">

  Your browser does not support the audio element.

</audio>- controls: Adds audio controls like play, pause, volume, etc.
- <source>: Specifies the audio file and format.
Summary
- HTML Attributes: Enhance the functionality and appearance of elements.
- Inline vs. External CSS: Inline styles are quick but less efficient, while external CSS keeps your code clean and maintainable.
- Semantic Elements: Provide meaning to the content and improve accessibility.
- Media Elements: The <video> and <audio> tags allow you to add multimedia content to your webpage easily.
HTML Do’s and Don’ts
When writing HTML, following certain practices is important to ensure your code is clean, readable, and effective. Here are some essential do’s and don’ts:
Do’s
Write clean and readable code:
- Use proper indentation and spacing for better readability.
- Keep your code organized and properly formatted.
- Use meaningful and descriptive names for classes, ids, and elements.
Example:
<header>

  <h1>My Website</h1>

  <nav>

    <ul>

      <li><a href="#">Home</a></li>

      <li><a href="#">About</a></li>

    </ul>

  </nav>

</header>
2. Close all tags properly:
- Always ensure that you close tags like <div>, <p>, and <li>.
- Self-closing tags like <img>, <br>, and <hr> don’t require a closing tag but should still be properly formatted.
Example:
<p>This is a paragraph.</p>

<img src="image.jpg" alt="Description">
3. Use semantic elements where appropriate:
Use HTML5 semantic tags (<header>, <footer>, <nav>, <article>, etc.) to enhance the structure and accessibility of your page.
Example:
<article>

  <h2>My Blog Post</h2>

  <p>Content goes here.</p>

</article>
Don’ts
- Don’t use inline styles excessively:
- Inline styles should only be used for small, one-off styling. For large projects, move styles to external CSS files.
- Don’t use non-semantic elements for structure:
- Avoid using <div> and <span> tags for structural elements if a semantic tag can be used (e.g., <section>, <header>, <footer>).
- Don’t forget to validate your HTML:
- Use an HTML validator to check your code for errors or mistakes. This helps avoid rendering issues and improves compatibility.
14. HTML Cheat Sheet Downloadable PDF
To further help you in your HTML learning journey, a downloadable PDF containing a summarized list of essential HTML elements, attributes, and examples will be available. This PDF will be an easy reference for quickly finding HTML tags and their uses.
15. Conclusion
This HTML cheat sheet provides a concise and accessible way to learn and reference HTML elements, attributes, and best practices. Practicing this cheat sheet will help reinforce your knowledge and improve your web development skills.
Key Takeaways:
- Keep your HTML code clean and well-organized.
- Use semantic elements to improve both accessibility and SEO.
- Download the cheatsheet PDF for easy offline reference.
FAQs
What is an HTML cheat sheet?
An HTML cheat sheet is a quick reference guide that summarizes HTML tags, attributes, and standard coding practices. It helps developers quickly find the needed HTML elements without looking up documentation.
How do I use a cheat sheet for HTML?
To use a cheatsheet effectively, refer to it when you need to look up HTML elements, attributes, or syntax while writing your code. It helps you save time and improves coding efficiency.
Is HTML still relevant today?
Yes, HTML is still the foundation of web development and remains highly relevant. It’s the standard markup language used to create web pages and applications, and no modern web experience can exist without it.
.