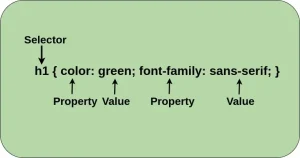
When you style a webpage with CSS, you write rules that target HTML elements and define how they should look, color, size, layout, and more. These rules are applied based on the selectors you write and the structure of your HTML. However, as your stylesheets grow more complex, a common problem arises: multiple CSS rules may target the same element with conflicting declarations. For example, one rule might set a button’s background to blue, while another tries to make it red. So, which one wins?
This is where specificity comes in. Specificity is the set of rules CSS uses to decide which style should be applied when multiple rules match the same element. It’s like a scoring system that gives priority to some selectors over others.
Understanding how specificity works is essential for writing clean, predictable, and maintainable CSS. Without it, you may find yourself fighting your own code, relying on !important or overcomplicating selectors to “force” styles to work. Learning specificity empowers you to write smarter CSS and build scalable stylesheets with confidence.
Are you thinking of becoming a software developer? If so, enrol in our web development course. Our bootcamp gives you hands-on practical experience, which makes you ready for the job market in less than 12 months.
What is Specificity in CSS?
Specificity in CSS is a set of rules used to determine which style declarations take precedence when multiple selectors target the same HTML element. In simple terms, it answers the question: “Which rule wins?”
Every CSS selector has a specificity value, which acts like a score. The browser uses these scores to decide which rule to apply if there’s a conflict. The higher the specificity, the more priority that rule has.
Specificity is not based on the order of appearance in the stylesheet (unless the conflicting selectors have equal specificity). For example, an ID selector (#header) will always override a class selector (.header) no matter which one comes first in your CSS file.
In summary, specificity is a ranking system that ensures the most appropriate rule is applied based on how specific the selector is, not where it’s written.
The Specificity Hierarchy
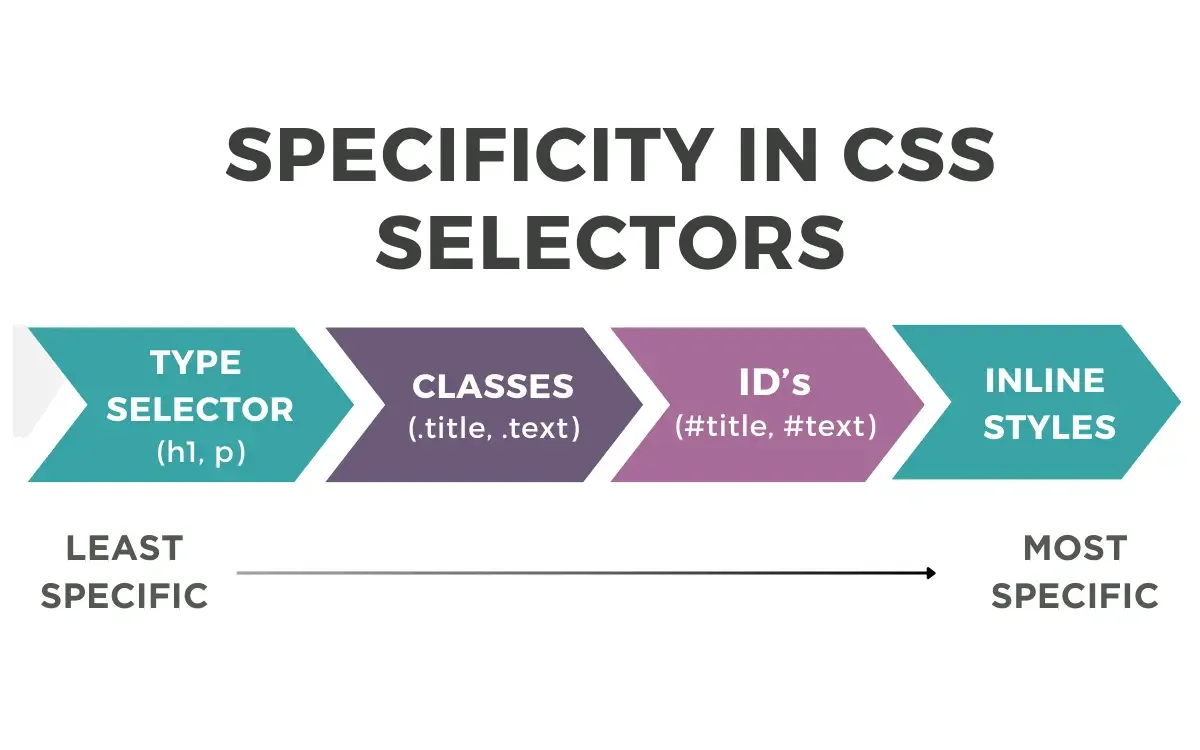
To understand how specificity works in CSS, it’s important to know how different types of selectors are ranked. Each selector type is assigned a “weight” in the specificity calculation. The more specific a selector is, the higher its weight and the more likely it is to override others.
Here’s the breakdown of selector types from highest to lowest specificity:
1. Inline Styles
- Example: <h1 style=”color: red;”>
- Specificity: 1,0,0,0
- Highest level of specificity (except !important)
- Applies directly to an element via the style attribute
2. ID Selectors
- Example: #header, #main-content
- Specificity: 0,1,0,0
- Stronger than class, attribute, and element selectors
3. Class Selectors, Attribute Selectors, and Pseudo-classes
- Examples:
- Class: .btn, .highlight
- Attribute: [type=”text”], [disabled]
- Pseudo-classes: :hover, :focus, :nth-child(2)
- Specificity: 0,0,1,0
- Commonly used in CSS frameworks and custom styles
4. Element Selectors and Pseudo-elements
- Examples: div, h1, ul, ::before, ::after
- Specificity: 0,0,0,1
- Lowest specificity
The Specificity Formula:
Specificity is calculated using a four-part numeric system:
(a, b, c, d)
- a – Inline styles
- b – Number of ID selectors
- c – Number of class, attribute, and pseudo-class selectors
- d – Number of element and pseudo-element selectors
Example:
/* Specificity: (0, 1, 1, 2) */

#main .btn h2 span {

  color: red;

}- #main → 1 ID selector
- .btn → 1 class selector
- h2, span → 2 element selectors
Total specificity: 0,1,1,2
This numeric system helps the browser decide which rule wins when multiple ones compete for the same element. If two rules have the same specificity, the one that appears later in the CSS file will be applied.
How Specificity is Calculated
Specificity in CSS is calculated using a four-part value:
(a, b, c, d) like a four-digit number where:
- a = Inline styles
- b = Number of ID selectors
- c = Number of classes, attributes, and pseudo-classes
- d = Number of elements and pseudo-elements
The browser compares these values from left to right, just like how it would compare 1000 vs 0100 vs 0010.
Visual Examples of Specificity Calculation
Let’s compare three selectors that target a <p> tag:
1. div p
- div = 1 element selector
- p = 1 element selector
- Specificity = (0, 0, 0, 2)
2. .content p
- .content = 1 class selector
- p = 1 element selector
- Specificity = (0, 0, 1, 1)
3. #main p
- #main = 1 ID selector
- p = 1 element selector
- Specificity = (0, 1, 0, 1)
Comparison of Specificity Scores:
| Selector | Specificity |
| #main p | (0, 1, 0, 1) |
| .content p | (0, 0, 1, 1) |
| div p | (0, 0, 0, 2) |
Result:
#main p wins because ID selectors have higher specificity than classes or elements.
Key Rule:
When multiple rules target the same element, the one with the highest specificity value wins, not necessarily the one written last.
If selectors have the same specificity, then the one that comes last in the CSS file is applied. This is the final tie‑breaker in the CSS cascade. For an academic explanation of specificity, cascade order, and how later declarations override earlier ones when specificity is equal, see the University of Minnesota–Duluth’s overview of Cascade, Specificity, and Inheritance.
Common Specificity Scenarios
Understanding specificity helps explain many of the frustrating situations developers face when styling webpages. Here are some of the most common scenarios where specificity comes into play:
1. When Two Rules Conflict
When two or more CSS rules target the same element and define the same property (like color, font-size, or background), the browser uses specificity to decide which rule takes priority.
Example:
p {

  color: black;

}

.article p {

  color: blue;

}
Here, .article p has a higher specificity than p, so paragraphs inside .article will be blue.
2. Overriding Styles Using Specificity
Sometimes you want to override existing styles, such as styles from a framework like Bootstrap. To do that, you need to use a selector with equal or higher specificity.
Example:
/* Bootstrap */

.btn {

  background-color: gray;

}

/* Your custom style */

.custom-section .btn {

  background-color: green;

}
.custom-section .btn has a higher specificity than .btn, so it will successfully override the default style.
3. Why Your Styles Sometimes Don’t Apply
If your styles aren’t being applied, it’s often because another rule with higher specificity is taking precedence.
Example:
/* This won't work if there's a more specific rule like: */

#nav .link {

  color: red;

}

/* Your attempt */

.link {

  color: blue; /* Ignored because #nav .link is more specific */

}
Even though both rules target .link, the ID selector #nav increases the specificity.
4. Misusing !important Due to Misunderstanding Specificity
When developers struggle with styles not being applied, they sometimes resort to !important to force it:
.button {

  color: blue !important;

}
While !important does override specificity, it’s often a sign of poor CSS management and can lead to unpredictable behavior when debugging or maintaining styles.
Best Practice:
Fix the problem by writing more specific selectors instead of overusing !important.
Quick Tip:
If you’re unsure why a style isn’t being applied, use your browser’s DevTools to inspect the element and check the computed styles and specificity of each rule.
How to Manage Specificity in Your CSS
Writing maintainable CSS means keeping specificity under control. If you don’t, you’ll eventually find yourself in a “specificity war” constantly adding more complex selectors or !important just to override styles. Here are some best practices to manage it effectively:
Best Practices
1. Keep Selectors Simple
Use the simplest selector needed to target the element. Deeply nested selectors like #wrapper .main .section ul li a span are hard to maintain and too specific.
/* Too specific */

#sidebar .nav .item a {

  color: blue;

}

/* Better */

.nav-link {

  color: blue;

}
2. Avoid Overly Specific Selectors
Overly specific selectors make overriding styles difficult. Avoid chaining IDs, classes, and elements unless absolutely necessary.
/* Problematic */

#header .menu ul li a.active {}

/* Prefer */

.nav-link.active {}
3. Prefer Class-Based Selectors Over ID Selectors
Classes are reusable and more flexible. IDs should be used sparingly in CSS, since they have high specificity and can’t be reused on multiple elements.
/* Avoid this */

#submit-button {

  background: red;

}

/* Use this */

.btn-submit {

  background: red;

}
4. Use a CSS Architecture (Like BEM)
The BEM (Block Element Modifier) naming convention helps keep selectors consistent, flat, and predictable, avoiding specificity issues.
Example:
/* BEM naming */

.card {}

.card__title {}

.card__button--primary {}
With BEM, you rarely need to nest selectors or increase specificity to override styles.
5. Use !important Carefully and Sparingly
!important should be your last resort. It overrides all specificity rules and can quickly make your CSS hard to debug.
When it’s okay:
- Utility/helper classes (e.g., .d-none { display: none !important; })
- Quick one-time overrides in rare cases
Avoid:
- Using !important to fix poor selector management
- Overriding framework styles without understanding their structure
Final Tip:
Use browser DevTools or a specificity calculator to understand how selectors are ranked. When you know why a rule wins, you’ll rarely need to fight your CSS.
Tools for Checking Specificity
If you’re ever unsure why a particular CSS rule is or isn’t being applied, there are several tools that can help you inspect and understand specificity. These tools can save you hours of debugging and help you write cleaner, conflict-free styles.
1. Browser DevTools (Built-in Inspectors)
Most modern browsers like Chrome, Firefox, and Edge come with powerful DevTools that allow you to:
- Inspect any element on the page
- View the applied CSS rules and their specificity
- See which rules are overridden and why
- Identify styles marked with !important or overridden due to higher specificity
Tip: In Chrome, open DevTools (Right-click → Inspect), go to the “Elements” panel, and check the “Styles” pane to see a live breakdown of CSS rules and their sources.
2. Specificity Calculator
- Website: https://specificity.keegan.st
- Paste any selector into the calculator, and it instantly shows its specificity score (e.g., 0,1,2,0)
- Great for comparing multiple selectors side by side
3. CSSLint
- Website: https://csslint.net
- An online tool and command-line utility that scans your CSS for errors and best practices
- Highlights overly specific selectors and other maintainability issues
4. Visual Studio Code Extensions
If you use VS Code, there are several extensions to help manage and understand specificity:
- CSS Peek – Jump to definition of class and ID selectors
- IntelliSense for CSS class names in HTML – Helps reduce selector errors
- Stylelint – Linter that warns you about overly specific or conflicting selectors
- Specificity Visualizer (experimental) – Visual overlay showing specificity weight in your editor
Many CSS frameworks (like Tailwind, Bootstrap, or Material UI) provide tools or guidelines for managing specificity. Always check the framework docs when overriding styles. Want to learn how to work with popular frameworks and write clean, maintainable CSS like a pro? Join our hands-on software development course in Kenya and gain the skills employers are looking for. Get started today at allthingsprogramming.com and become a job-ready developer in 10–12 months.
Specificity vs. Other CSS Concepts
Specificity is just one part of the puzzle when it comes to how CSS rules are applied. To write effective CSS, it’s important to understand how specificity, source order, and inheritance interact and how they differ.
Let’s break them down:
Specificity vs. Source Order
- Specificity is about how strongly a selector targets an element.
- Source order is about when a rule appears in the stylesheet or HTML document.
If two selectors have the same specificity, the one that appears later in the CSS (or is loaded last) will override the earlier one.
Example:
/* First rule */

.text {

  color: blue;

}

/* Later rule with same specificity */

.text {

  color: red;

}
Result: Text will be red, because the second rule comes later, even though both selectors have equal specificity.
Specificity vs. Inheritance
- Inheritance is when some CSS properties (like color, font-family) are automatically passed from a parent to a child element.
- Specificity applies when a CSS rule is explicitly written to target an element.
Inherited values have no specificity, so any explicitly defined style (even a very low-specificity selector) will override them.
Example:
body {

  color: blue; /* This color is inherited by p, span, etc. */

}

span {

  color: red; /* Overrides inheritance */

}
Result: The span will be red because it has an explicitly defined rule, even though body’s color was inherited.
Common Confusion Cleared Up
| Concept | Description | Priority (High to Low) |
| Specificity | The “strength” of the selector targeting an element | High |
| Source Order | Later styles override earlier ones if specificity is equal | Medium |
| Inheritance | Styles passed down from parent elements | Low – easily overridden by any selector |
In Practice:
- Inherited styles can be overridden by any selector.
- Low-specificity rules can be overridden by higher-specificity ones.
- If specificity is equal, the last rule wins (source order).
Real-World Examples and Case Studies
To truly understand the importance of specificity in CSS, let’s look at real scenarios where ignoring it caused styling issues and how understanding it helped solve the problem.
Example 1: Broken Button Styling Due to Incorrect Specificity
The Problem:
A developer added a custom style for a button on a landing page, but it wasn’t being applied. The button stayed gray, even though the custom style clearly said it should be blue.
CSS Code:
/* Bootstrap framework style */

.btn {

  background-color: gray;

}

/* Custom override */

.blue-button {

  background-color: blue;

}
HTML Code:
<button class="btn blue-button">Click Me</button>Why It Failed:
The .btn class in Bootstrap was loaded after .blue-button, and both selectors have the same specificity (0,0,1,0). Since .btn came later, it won.
Fix Using Specificity:
.btn.blue-button {

  background-color: blue;

}
Now the selector .btn.blue-button has higher specificity (0,0,2,0), so it successfully overrides Bootstrap’s .btn rule.
Example 2: Fixing a Layout Bug Using Specificity Knowledge
The Problem:
On a dashboard page, the developer tried to hide a sidebar in mobile view:
.sidebar {

  display: none;

}
But it didn’t work, the sidebar still showed up.
Digging Deeper:
There was a media query that was overriding the rule:
@media (min-width: 600px) {

  #main .sidebar {

    display: block;

  }

}
The selector #main .sidebar had higher specificity than .sidebar, so even though the mobile rule came later in the file, it was being ignored.
The Fix:
Increase the specificity of the mobile rule:
body .sidebar {

  display: none;

}
Or better yet, restructure CSS to avoid specificity conflicts:
@media (max-width: 599px) {

  .sidebar {

    display: none !important;

  }

}(Using !important here is justifiable in limited, responsive edge cases.)
Takeaway:
- Many styling bugs are not about “broken CSS,” but misunderstood specificity.
- Understanding specificity gives you control, reduces reliance on !important, and helps keep your CSS scalable.
To conclude, specificity is one of the most important yet often misunderstood concepts in CSS. It’s the browser’s way of deciding which rule wins when multiple styles apply to the same element. By understanding how specificity is calculated and how it interacts with source order and inheritance, you can write more reliable, maintainable stylesheets.
Instead of relying on trial-and-error or !important to fix styling issues, mastering specificity allows you to structure your CSS intelligently, avoid conflicts, and debug faster.
Whether you’re working on a personal project or maintaining a large codebase, knowing how specificity works will make you a more confident and effective front end developer.