HTML (HyperText Markup Language) is the foundational language of the web and is used to structure and display content in web browsers.
It organizes the content on a page, from text and images to links and multimedia elements. In web development, HTML acts as the backbone, determining the layout and structure of websites by defining elements like headers, paragraphs, images, and links.
Alongside CSS and JavaScript, HTML enables developers to create interactive, visually appealing, and accessible web pages.
Importance of Learning Through Examples to Understand HTML Structure and Syntax
Understanding HTML is essential for anyone learning web development, as it helps develop a strong grasp of how web content is organized and displayed.
Working through examples offers a practical way to understand HTML’s structure, including tags, attributes, and the hierarchy of elements.
Examples make it easier to see how code transforms into a visual webpage, reinforcing concepts and building confidence.
1. Basic HTML Structure
Each document follows a standard structure in HTML, providing a framework for web browsers to interpret and render content. Below is a basic HTML document layout that demonstrates the foundational elements.
Example of a Simple HTML Document Layout
<!DOCTYPE html>

<html lang="en">

  <head>

    <meta charset="UTF-8">

    <meta name="viewport" content="width=device-width, initial-scale=1.0">

    <title>My First HTML Page</title>

  </head>

  <body>

    <h1>Welcome to My Page</h1>

    <p>This is a simple example of an HTML document structure.</p>

  </body>

</html>
Explanation of Key Elements
- <!DOCTYPE html>
This declaration informs the browser that the document follows HTML5 standards. It must appear at the top of every HTML document to ensure consistent rendering across browsers.
- <html>
The <html> tag is the root element that wraps all HTML content. It signifies the beginning of the HTML document and typically includes a lang attribute to specify the document language for accessibility and SEO.
- <head>
The <head> section contains metadata and resources for the document. This can include the document’s title (displayed in the browser tab), character set (<meta charset=”UTF-8″>), viewport settings for responsiveness, and links to external resources (e.g., CSS files or fonts). The content here doesn’t appear on the page but informs how the page behaves.
- <body>
The <body> tag holds all visible content for the page, such as text, images, links, and multimedia. ‘
In addition, everything placed within the <body> section is rendered on the browser screen for users to interact with.
HTML elements use opening (<tag>) and closing tags (</tag>) to enclose content, creating a hierarchical structure that browsers can interpret.
2. Headings and Paragraphs in HTML
HTML offers six levels of headings, from <h1> (the most important) to <h6> (the least important), and a paragraph tag, <p>, for blocks of text.
Code Example of Different Heading Levels and Paragraph Text
<!DOCTYPE html>
<html lang="en">
<head>
<meta charset="UTF-8">
<title>Headings and Paragraphs Example</title>
</head>
<body>
<h1>Main Heading (H1)</h1>
<p>This is a paragraph under the main heading. Paragraphs are enclosed in <code><p></code> tags.</p>
<h2>Subheading (H2)</h2>
<p>This paragraph supports the subheading and adds additional information.</p>
<h3>Section Heading (H3)</h3>
<p>Another paragraph providing details for a smaller section within the content.</p>
<h4>Subsection Heading (H4)</h4>
<p>Details or subpoints under the previous section, organized with a lower heading level.</p>
<h5>Minor Heading (H5)</h5>
<p>Text under a minor heading to give further clarification or notes.</p>
<h6>Least Important Heading (H6)</h6>
<p>Information that is least prominent within the document structure.</p>
</body>
</html>Explanation of Best Practices for Heading Use in HTML for Readability and SEO
- Use Headings to Structure Content Hierarchically
Headings help readers and search engines understand the structure of the content. The <h1> tag should be used only once per page to represent the main title, while subsequent headings (<h2>, <h3>, etc.) should be used to break down the content logically.
2. Keep Headings Descriptive and Relevant
Each heading should be descriptive, giving readers an idea of the section’s content. Search engines prioritize keywords in headings for SEO, so placing keywords naturally within headings can improve page visibility.
3. Avoid Skipping Heading Levels
For consistency and readability, use headings in order (e.g., <h2> after <h1>, <h3> after <h2>). Skipping levels can make it harder for readers and screen readers to follow the structure, negatively impacting accessibility and user experience.
4. Use <p> Tags for Paragraphs and Main Text Blocks
Paragraphs are the main building blocks of textual content and should always be enclosed in <p> tags.
This maintains a logical structure and helps ensure content is properly spaced and styled, improving readability.
3. Links and Anchors in HTML
Anchors and Links allow users to move between pages or specific sections within a page. Links are created with the <a> (anchor) tag, which supports attributes like href for URLs and id for in-page navigation.
Example of Creating a Hyperlink
<!DOCTYPE html>

<html lang="en">

  <head>

    <meta charset="UTF-8">

    <title>Links and Anchors Example</title>

  </head>

  <body>

    <h1>Welcome to My Website</h1>

    <p>Visit the <a href="https://example.com">Example Website</a> to learn more about HTML.</p>

  </body>

</html>
In this example, the text “Example Website” is a clickable link that navigates to https://example.com.
Using Anchor Tags for Navigation Within a Page
Anchor tags can also be used for in-page navigation by assigning an id attribute to an element and linking to it with #id.
<!DOCTYPE html>

<html lang="en">

  <head>

    <meta charset="UTF-8">

    <title>In-Page Navigation Example</title>

  </head>

  <body>

    <h1>Table of Contents</h1>

    <ul>

      <li><a href="#section1">Go to Section 1</a></li>

      <li><a href="#section2">Go to Section 2</a></li>

    </ul>

    <h2 id="section1">Section 1</h2>

    <p>This is the content for Section 1.</p>


    <h2 id="section2">Section 2</h2>

    <p>This is the content for Section 2.</p>


    <p><a href="#top">Back to top</a></p>

  </body>

</html>
In this example:
- The href=”#section1″ link navigates to the <h2 id=”section1″> heading.
- The Back to top link (href=”#top”) allows users to return to the top of the page if the <h1> heading has id=”top”.
The title attribute can offer extra information about a link when hovered over but should not replace descriptive link text. For example, <a href=”https://example.com” title=”Visit the Example Website”>Example Website</a>.
4. Images in HTML
Embedding images in HTML is done with the <img> tag, which uses attributes to specify the image source and alt text for accessibility.
Images can significantly enhance a webpage’s visual appeal and communication but require optimization for performance.
Example of Embedding an Image Using the <img> Tag
<!DOCTYPE html>

<html lang="en">

  <head>

    <meta charset="UTF-8">

    <title>Image Embedding Example</title>

  </head>

  <body>

    <h1>My Favorite Nature Spot</h1>

    <img src="forest.jpg" alt="A lush green forest with tall trees and sunlight streaming through the leaves" width="500" height="300">

  </body>

</html>
In this example:
- src=”forest.jpg” specifies the image source path, which can be relative (if the image is in the same directory) or an absolute URL.
- alt=”A lush green forest with tall trees and sunlight streaming through the leaves” provides alternative text that describes the image, which is essential for accessibility and SEO.
- The width and height attributes help control the display dimensions on the page.
Explanation of Key Attributes
- src Attribute
The src (source) attribute specifies the location of the image file. The path can be relative to the document or an external URL.
- alt Attribute
The alt (alternative text) attribute provides a text description for the image. It improves accessibility by offering context to screen readers, which read the alt text aloud for visually impaired users.
It also helps SEO, as search engines can index the alt text to understand the image content.
Guidelines on Optimizing Images for Faster Page Loading
Define Image Dimensions
Specify width and height attributes directly within the <img> tag to prevent layout shifts as the image loads. This improves the user experience by reducing page reflow.
Lazy Loading
Use the loading=”lazy” attribute to defer offscreen images’ loading until the user scrolls near them. This reduces initial load time, especially for image-heavy pages. Example:
<img src="image.jpg" alt="Example" loading="lazy">Use Responsive Images
For responsiveness, consider using srcset to specify different image sizes based on screen resolutions, ensuring mobile users load smaller files. Example:
<img src="small.jpg" srcset="large.jpg 1024w, medium.jpg 768w, small.jpg 480w" alt="Responsive image">5. Lists in HTML
Lists in HTML allow for easy organization of related items, whether they need to follow a specific sequence (ordered) or not (unordered). The <ol> and <ul> tags define ordered and unordered lists, respectively, and the <li> tag represents each list item.
Examples of Ordered and Unordered Lists
-
Ordered List (<ol>)
An ordered list displays items in a numbered sequence, which is useful when order matters, such as steps in a process.
<h2>Steps to Make Coffee</h2>

<ol>

  <li>Boil water</li>

  <li>Add coffee grounds to a filter</li>

  <li>Pour hot water over the grounds</li>

  <li>Stir and let it brew for a few minutes</li>

  <li>Serve and enjoy</li>

</ol>-
Unordered List (<ul>)
An unordered list displays items with bullet points, ideal for lists where order doesn’t matter.
<h2>Grocery List</h2>

<ul>

  <li>Apples</li>

  <li>Bread</li>

  <li>Milk</li>

  <li>Eggs</li>

</ul>
Explanation of the <li> Tag
The <li> (list item) tag is used to define each item within a list, whether in <ol> or <ul>. Each <li> tag automatically inherits the formatting of its parent list type, displaying numbers for ordered lists or bullets for unordered lists.
Example of Nested Lists for Complex List Structures
Nested lists are useful when organizing categories and subcategories, creating a hierarchical structure within a list.
<h2>Plan for the Day</h2>

<ul>

  <li>Morning Routine

    <ul>

      <li>Wake up</li>

      <li>Exercise</li>

      <li>Shower and breakfast</li>

    </ul>

  </li>

  <li>Work Tasks

    <ol>

      <li>Reply to emails</li>

      <li>Team meeting

        <ul>

          <li>Project updates</li>

          <li>Assign new tasks</li>

        </ul>

      </li>

      <li>Complete coding assignment</li>

    </ol>

  </li>

  <li>Evening Routine

    <ul>

      <li>Cook dinner</li>

      <li>Read a book</li>

      <li>Relax and sleep</li>

    </ul>

  </li>

</ul>
In this example:
- The primary <ul> list contains top-level activities.
- Subtasks for each main item are nested within <ul> or <ol> lists.
- This nested structure improves readability, making it easier to follow complex information hierarchies.
6. Tables in Html
Tables are a powerful way to display data in a structured format, using rows and columns for easy readability.
HTML tables are created with a combination of the <table>, <tr>, <td>, and <th> tags, each serving a unique role.
Basic Example of an HTML Table
<!DOCTYPE html>

<html lang="en">

  <head>

    <meta charset="UTF-8">

    <title>Basic HTML Table</title>

  </head>

  <body>

    <h2>Monthly Sales Report</h2>

    <table border="1">

      <tr>

        <th>Month</th>

        <th>Sales ($)</th>

        <th>Profit ($)</th>

      </tr>

      <tr>

        <td>January</td>

        <td>5,000</td>

        <td>1,200</td>

      </tr>

      <tr>

        <td>February</td>

        <td>6,500</td>

        <td>1,500</td>

      </tr>

      <tr>

        <td>March</td>

        <td>7,200</td>

        <td>1,800</td>

      </tr>

    </table>

  </body>

</html>
In this example:
- <table border=”1″> creates the table with a simple border for visual separation.
- <tr> defines a table row.
- <th> represents a table header cell typically bolded and centered.
- <td> defines a table data cell for regular data.
Explanation of Headers, Rows, and Cells
- Headers (<th>)
- The <th> tag is used for header cells in a table, commonly used in the first row to label columns. Table headers are displayed in bold and center-aligned by default, distinguishing them from regular data cells.
- Rows (<tr>)
- The <tr> tag defines a row within the table. Each table row contains either <th> or <td> cells, depending on whether it’s a header row or a data row.
- Cells (<td>)
- The <td> (table data) tag represents a single cell within a row containing data values. Each <td> cell aligns with the headers above it and aligns data within the row.
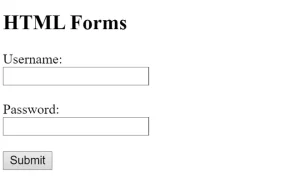
7. Forms and Input Fields in HTML
Forms are essential in HTML for collecting user data. A basic form contains a <form> tag with various input types for different data entries.
Forms can include text fields, email fields, password fields, and a submit button to process the data.
Example of Creating a Basic HTML Form
<!DOCTYPE html>

<html lang="en">

  <head>

    <meta charset="UTF-8">

    <title>Basic HTML Form</title>

  </head>

  <body>

    <h2>Contact Us</h2>

    <form action="/submit_form" method="post">
      <label for="name">Name:</label>

      <input type="text" id="name" name="name" placeholder="Enter your name"><br><br>

      <label for="email">Email:</label>

      <input type="email" id="email" name="email" placeholder="Enter your email"><br><br>

      <label for="password">Password:</label>

      <input type="password" id="password" name="password" placeholder="Enter your password"><br><br>

      <input type="submit" value="Submit">

    </form>

  </body>

</html>
In this example:
<form action=”/submit_form” method=”post”> defines a form with an action URL (/submit_form) where data will be sent upon submission and a method (post) to transmit data securely.
Each <label> tag pairs with an input to describe the field, improving accessibility.
The placeholder attribute provides hints for users about the expected input.
Explanation of Different Input Types
- Text (<input type=”text”>)
Used for single-line text inputs, such as a name or address.
Example:
<input type="text" placeholder="Enter your name">- Email (<input type=”email”>)
This field specializes in email addresses and validates input to ensure proper email formatting (e.g., name@example.com).
Example:
<input type="email" placeholder="Enter your email">- Password (<input type=”password”>)
Masks the input to protect sensitive information, like passwords. Each character appears as a dot or asterisk for privacy.
Example:
<input type="password" placeholder="Enter your password">- Submit (<input type=”submit”>)
Creates a button to send form data to the server. The value attribute customizes the button text (e.g., “Submit”).
Example:
<input type="submit" value="Send Message">8. Embedding Multimedia in HTML
Multimedia elements like video and audio enrich web content, making it more engaging for users. HTML provides the <video> and <audio> tags for embedding these elements directly on a web page. Controls, alternative sources, and file formats ensure smooth playback and compatibility across different devices and browsers.
Example of Adding Video and Audio Elements
Video Element Example
<!DOCTYPE html>

<html lang="en">

  <head>

    <meta charset="UTF-8">

    <title>Embedding Video</title>

  </head>

  <body>

    <h2>Our Promotional Video</h2>

    <video width="640" height="360" controls>

      <source src="video.mp4" type="video/mp4">

      <source src="video.ogg" type="video/ogg">

      Your browser does not support the video tag.

    </video>

  </body>

</html>
In this example:
<video width=”640″ height=”360″ controls> creates a video element with playback controls like play, pause, and volume.
The <source> tag specifies multiple file formats (e.g., mp4 and ogg) to ensure compatibility with different browsers.
Text inside the <video> tag provides an alternative message for browsers not supporting the video element.
Audio HTML Element Example
<!DOCTYPE html>

<html lang="en">

  <head>

    <meta charset="UTF-8">

    <title>Embedding Audio</title>

  </head>

  <body>

    <h2>Listen to Our Theme Song</h2>

    <audio controls>

      <source src="audio.mp3" type="audio/mpeg">

      <source src="audio.ogg" type="audio/ogg">

      Your browser does not support the audio tag.

    </audio>

  </body>

</html>
In this example:
<audio controls> create an audio element with playback controls.
Multiple <source> tags ensure the audio file can play across various browsers by providing different formats (e.g., mp3 and ogg).
Explanation of Using Controls and Specifying Sources
Controls Attribute
The controls attribute is added to both <video> and <audio> tags to display playback controls like play, pause, and volume adjustment, enabling users to manage the media playback.
Specifying Sources with <source>
The <source> tag is used within <video> and <audio> elements to list media files in various formats. Each <source> element specifies:
- The file path with src, e.g., src=”video.mp4″.
- The MIME type with type, e.g., type=”video/mp4″ or type=”audio/mpeg”.
This approach ensures compatibility since not all browsers support every format.
9. Inline vs. Block Elements in HTML
Understanding the difference between inline and block elements is crucial for effective web design and layout.
Inline elements flow within the text, while block elements create distinct web page sections, impacting how content is displayed and organized.
Examples of Common Inline and Block Elements
1. Inline Elements
Inline elements occupy only the space required for their content and do not start on a new line. Common inline elements include:
- <span>: Style a portion of text within a block.
<p>This is a <span style="color: red;">red</span> word in a paragraph.</p> - <a>: Represents a hyperlink that users can click on to navigate to another page or resource.
<p>Visit our <a href="https://example.com">website</a> for more information.</p>- <strong>: Indicates strong importance, typically displayed as bold text.
<p>This is <strong>important</strong> information.</p>
2. Block Elements
Block elements take up the full width and begin on a new line, creating distinct sections. Common block elements include:
- <div>: A generic container for grouping content and applying styles.
<div style="background-color: lightgray;">

  <h2>Welcome!</h2>

  <p>This is a block-level element.</p>

</div>- <p>: Represents a paragraph, automatically creating space above and below it.
<p>This is a paragraph of text.</p> - <h1> to <h6>: Header elements used for titles and subtitles, each defining a different level of importance.
<h1>Main Title</h1>

<h2>Subtitle</h2>
Inline vs. Block Elements in HTML
Understanding the difference between inline and block elements is crucial for effective web design and layout. Inline elements flow within the text, while block elements create distinct web page sections, impacting how content is displayed and organized.
Examples of Common Inline and Block Elements
- Inline Elements
Inline elements occupy only the space required for their content and do not start on a new line. Common inline elements include:
<span>: Used to style a portion of text within a block.
<p>This is a <span style="color: red;">red</span> word in a paragraph.</p><a>: Represents a hyperlink that users can click on to navigate to another page or resource.
<p>Visit our <a href="https://example.com">website</a> for more information.</p><strong>: Indicates strong importance, typically displayed as bold text.
<p>This is <strong>important</strong> information.</p>- Block Elements
Block elements take up the full width and begin on a new line, creating distinct sections. Common block elements include:
<div>: A generic container used for grouping content and applying styles.
<div style="background-color: lightgray;">

  <h2>Welcome!</h2>

  <p>This is a block-level element.</p>

</div><p>: Represents a paragraph, automatically creating space above and below it.
<p>This is a paragraph of text.</p><h1> to <h6>: Header elements used for titles and subtitles, each defining a different level of importance.
<h1>Main Title</h1>

<h2>Subtitle</h2>
Explanation of the Difference Between Inline and Block Elements in Layout Design
1. Inline Elements
Flow: Inline elements are displayed within the line of text, allowing other elements to flow around them. They do not disrupt the surrounding text layout.
No New Line: Inline elements do not start on a new line, making them suitable for styling text parts without breaking the flow.
Use Case: Ideal for formatting text, adding links, or applying styles to portions of content.
2. Block Elements
- Structure: Block elements create a new line and occupy the full width available, thus visually structuring the layout and separating content.
- Spacing: Block elements automatically include space (margins) above and below them, making them useful for organizing content sections.
- Use Case: Suitable for defining larger content areas, such as headers, sections, or containers.
Tips for Choosing Appropriate Elements for Different Scenarios
1. Use Inline Elements for Text Formatting
Choose inline elements to style a small portion of text without disrupting the surrounding content, such as emphasizing keywords or adding links.
2. Use Block Elements for Layout Structure
Opt for block elements when you need to create distinct sections, such as headings, paragraphs, or content groups. This helps in organizing the page layout effectively.
3. Mix and Match
Don’t hesitate to combine inline and block elements to achieve the desired layout and formatting. For example, you can place inline elements like <span> and <a> inside block elements like <div> or <p>.
5. Semantic HTML
Use semantic elements (like <header>, <footer>, <article>, and <section>) for better structure and accessibility. These elements convey their purpose and help search engines understand the content better.
5. Avoid Using Inline Elements for Layout
Avoid using inline elements for layout, as they do not offer spacing and structure. Instead, use block elements to maintain a clear and logical layout.